Every ETABS user meets this warning eventually, usually on a model they were confident in. The analysis stops, the log fills with capital letters, and the natural reaction is to start clicking around the model hoping to spot the problem. That approach can eat an afternoon. The warning is actually far more informative than it looks, and there's a diagnostic sequence that finds the cause in minutes rather than hours.
What the warning is really saying
The solver has reached a point where it can't reliably invert the stiffness matrix. That happens for one of two distinct reasons, and telling them apart is most of the diagnosis:
- Unstable: some part of the structure has nothing holding it. A degree of freedom can move freely with zero resistance.
- Ill-conditioned: nothing is loose, but the stiffness numbers are so badly scaled that the arithmetic loses precision. The solver is telling you it no longer trusts its own answer.
Both produce the same message. They are different problems with different fixes.
The causes, and what each one actually looks like in a model
ETABS lists its own suspects in the log. Here's what they mean in practice:
| Cause the log names | Type | What it usually is in a real model |
|---|---|---|
| Inadequate support conditions | Unstable | A column base or foundation with no restraint, or a release that was never intended |
| Internal mechanism | Unstable | Elements that look joined but don't share a joint: a wall with a gap, a slab not connected to a wall, a brace released at both ends |
| Zero or negative stiffness | Unstable | A property modifier set to zero in a direction that matters, or an over-release that removes a joint's last restraint |
| Extremely large stiffness | Ill-conditioned | A rigid element, a huge modifier, or a very stiff spring sitting next to ordinary members |
| P-Delta / geometric buckling | Analysis setup | Usually the P-Delta definition, not the geometry |
| Frequency shift on a natural frequency | Analysis setup | An eigen setting, rarely a modelling error |
In a typical building model, the first three rows cover almost every case. The fourth is the one people don't expect, because nothing is actually floating; the scaling is the problem.
The diagnostic sequence: make the solver find it
Don't hunt by eye. This is the sequence that turns an afternoon into twenty minutes:
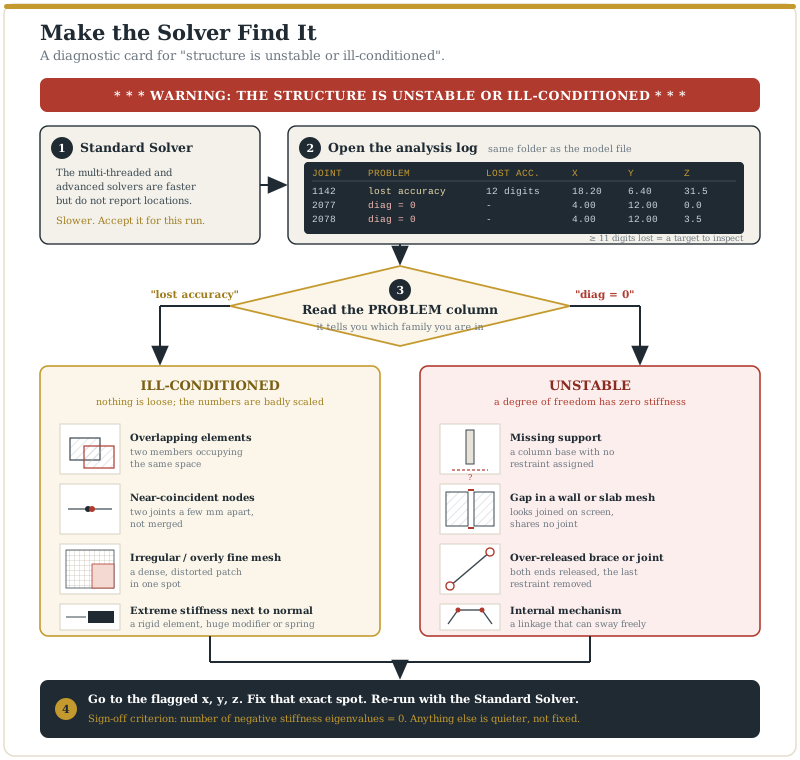
- Switch to the Standard Solver. The default multi-threaded and advanced solvers are faster but don't report instability locations. The Standard Solver does. It's slower; accept that for the diagnostic run.
- Open the analysis log. It sits in the same folder as the model file. Find the table of problem joints.
- Read the problem type. The log names it, and this is the single most useful thing on the page (see below).
- Find the flagged joints. Look for a loss of accuracy of eleven digits or more. Those are your targets, with x, y, z coordinates.
- Go to the coordinates and inspect that exact spot. Are the elements snapped to a common joint? Is there a gap? Is a release removing the last restraint? Is a support missing? Is the mesh irregular?
- Fix, then re-run with the Standard Solver. Repeat until the number of negative stiffness eigenvalues is zero. That's the solver's own stability criterion, and it's the only sign-off that means the problem is gone rather than just quieter.
Reading the log: the two problem types
The log's problem column is where the real diagnosis happens, because it tells you which of the two families you're in:
| Log shows | It means | Look for |
|---|---|---|
| Lost accuracy | Ill-conditioned or near-coincident geometry | Overlapping elements, nodes almost on top of each other, an overly fine or irregular mesh in one spot, a huge stiffness next to a normal one |
| diag = 0 | Genuine instability, a DOF with zero stiffness | A missing support, an over-released joint, a mechanism, a disconnected element |
Get this split right and you already know what kind of thing you're looking for before you've opened the model. That's the difference between a targeted fix and trial and error.
Why you can't ignore it, even when the run completes
Sometimes the model runs and produces results despite the warning. Don't take that as permission. An ill-conditioned matrix still gives you numbers, but they're numbers the solver has explicitly flagged as untrustworthy. Forces can redistribute through the badly conditioned zone in ways that have nothing to do with the real structure, and a small local error can shift design forces significantly elsewhere. A completed run with this warning attached is a design built on arithmetic the software has told you not to trust. Resolve it first, then design.
What this means in practice
Read the warning as information, not an obstacle. It's telling you either that something has nothing holding it, or that the stiffness numbers are too badly scaled to solve cleanly. Standard Solver, open the log, separate "lost accuracy" from "diag = 0", go to the flagged coordinates, fix what's actually there, re-run until the negative eigenvalue count hits zero.
The engineers who lose an afternoon to this warning are the ones who hunt by eye. The ones who resolve it in twenty minutes are the ones who made the solver point at the problem. Same warning, very different day.
The above reflects general modelling practice for educational purposes; resolving any specific model remains a matter of engineering judgement.